

A new week means a new exotic quest in Destiny 2: Beyond Light Season of the Chosen. To get the latest exotic, which is a Scout Rifle called Dead Man’s Tale, you’re going to need to revisit an old strike and get real cozy with Zavala. Here’s what you need to know with a helpful Destiny 2: Season of the Chosen Dead Man’s Tale exotic quest guide.
Before you get started on the actual quest, there are a few things you need to do first. To get started, you’re going to want to be at least 1230 Power for the actual quest. So if you’re not there yet, run some dailies and grind a bit. You will also need to have the Season Pass in order to start this quest. You can learn more about that here.
For those who are already at least 1230, the next step is to head over to the Strike on the EDZ (European Dead Zone). The strike itself is called The Arms Dealer. If you’ve already run this strike, what’s next will be super quick. If not, you’ll want to make sure you run the entire strike as it is meant to be run.

How to get the Dead Man’s Tale quest
Once in this strike, you’re going to see a newly available entry point instead of following the quest marker. Take the alternate new path to head into a hallway with two levels, then take out the Scorpius enemies that will be in your path. Continue forward until you see more Scorpius foes and the boss you’ll need to take out: Than’Grot. He’s pretty easy to annihilate. Do that and take out the remaining Scorpius to proceed to the platform on the far right. There, you’ll see a new marker appear that will take you to a pile of crates. Inside the big blue crate is an Intercepted Distress Signal. Get that and (for those that have already done this strike) head back to the Tower.
Once at the Tower, speak to Zavala in his usual spot. He’ll go on a monologue like he often does, but once done, he will offer a quest up for grabs:
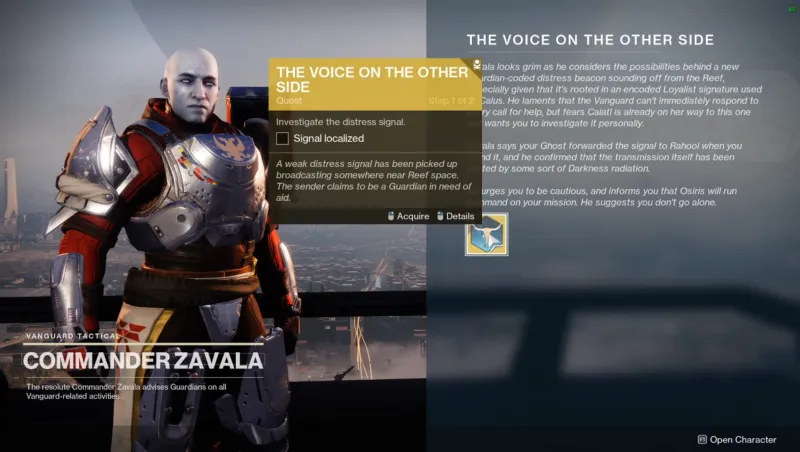
Once the Voice on the Other Side quest is picked up, there are two steps to follow. In order to “investigate the distress signal,” you’re going to need to head to the Tangled Shore. The Tangled Shore was a part of the Forsaken expansion, so for those that boosted their character or chose to opt out of this DLC, you’re going to need to do one of two things:
-
Complete the first part of the Forsaken expansion (which is really good!)
-
Get someone who has already unlocked this area to join your part, toss party leader to them, and piggyback a ride to this destination
How to complete the new Presage exotic quest
Click here to watch embedded media
Mark this quest active and head to Tangled Shore. Once this destination is pulled up when in orbit, you’ll see a new area open up in the top-left corner of this destination. It’s there that players will be able to see the newest exotic mission called Presage, which takes place aboard Calus’ abandoned ship.
Note: One of my clanmates said that he thinks this can be run solo. I don’t know if I’m just that bad at jumping, but I haven’t even attempted to run this by myself. With my own experience in mind, please run with teammates.
This quest is lengthy, so you’re going to want to strap in for a little bit when running it for the first time. First things first: Ignore the big door. When you first start the quest, you’ll see a main door in your path. You can’t open it at this time, so don’t even worry about it. Instead of going through it, you’re going to go around it and you can do just that with the first of many jumping puzzles on the left.
During this quest, you will see the addition of Spores. These will allow Guardians to safely go through particular doors that are lethal when used without the aid of the Spores. To use these, have your fellow players stand in the vicinity of the Spores to shoot them when they start to glow. Shooting the Spore while it is blue will activate a buff that will protect you when going through each doorway.
A couple things to consider:
-
There will be switches to open doors, but cores can also be shot as well.
-
Shooting fuses available can open doors, halt danger, and take down any barriers that are in the way.
Eventually, the latest quest will have you falling face-first into a trash area alongside Screebs. In order to stop the contractor mechanism, you’re going to want to search the floor for every grate to shoot until you find one that holds the core. As mentioned earlier, you need to shoot the fuse to stop the contractor from making you just another piece of trash in the pile, or the one that opens up the hatch that you can jump through before getting crushed.
The next step is to search through tunnel areas. Continue through each area until you find the entrance back into the original area where you first came from. Once you make it back to this location, you’re ready to take on the remaining puzzles to continue onto the final boss fight.
Luckily, this is a pretty linear path to the missions, so don’t go into it feeling overwhelmed by how seemingly massive this area is. It’s relatively straightforward. Once you get to the final fight, you’ll actually fight him on two different levels. On the upper level, there are three terminals that you’ll need to be aware of, including one that is in a burning room. Each monitor needs to be activated in order to disable the burning room and make it to the next step. From there, drop down to the below level to deal damage and alternating between the upper and lower levels to defeat the boss.
You can also watch the walkthrough video courtesy of xHoundishx while we work on getting our own walkthrough put together (which will have the same info, but with a lot more dying).
Source: Game Informer Destiny 2: Season of the Chosen Dead Man's Tale Exotic Quest Guide